


The kit includes a little booklet full of different cake pop recipes, a cake pop stand, cello bags, cake pop sticks, gift cards and ribbon.
I decided to start out with the simple cake pops - I really wanted to make the cupcake shaped ones, but I'll try those when I'm a bit more confident!
520g box cake mix [yep, bit of cheating - I used Betty Crocker!]
455g frosting [again, I used Betty Crocker]
3lb candy coating
This is for 48 cake pops, so alter according to how many you wish to make! I used less as I only made 12 cake pops.
Bake the cake according to the instructions on the box. Let the cake cool completely.
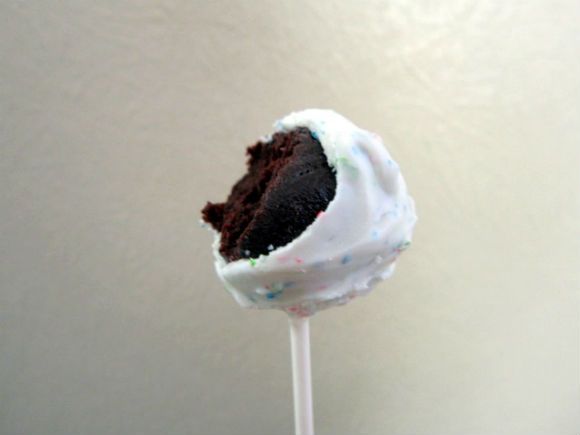
Crumble the cake into a large mixing bowl.
Add three-quaters of the frosting and mix. At this stage, I used a little bit of frosting at a time as I didn't want the mixture to be too moist.
Now it's time to start rolling! Roll the mixture into 1 1/2 inch balls and place them onto a tray lined with baking paper. Cover the tray with cling film and pop in the fridge for several hours, or the freezer for 15 minutes if you're in a hurry.
Put the candy coating in a deep, microwave safe container and melt in the microwave according to the instructions on the packet. I microwaved on medium power 30 seconds at a time, it only took a couple of minutes or so to fully melt.
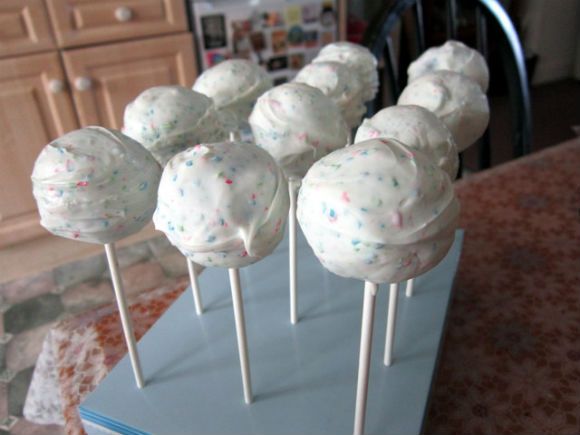
Now to dip! Dip about half an inch of the tip of a stick into the candy coating, then insert it straight into a cake ball. Push it no more than halfway through.
Holding the stick with the cake ball attached, dip the entire cake ball into the candy coating until it is completely covered. Remove in one motion, making sure the coating meets at the base of the stick. If some excess coating starts to drip, hold the cake pop over the bowl and rotate.
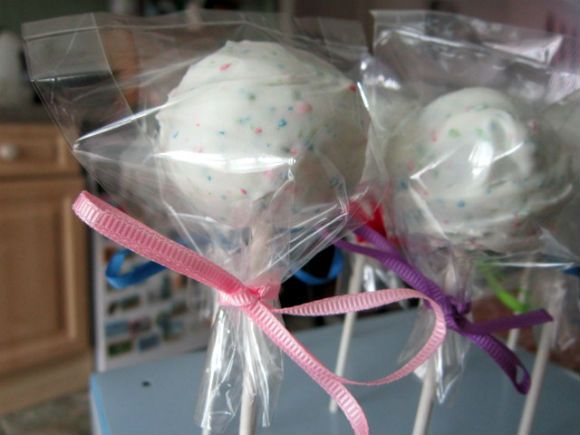
Stick the cake pop in the stand, and repeat! Let them all dry completely then cover with cello bags, tied with ribbon. They can be stored in an airtight container or in the fridge for several days.
My first batch of cake pops went down very well at my friend's birthday BBQ, and I will be making them again next month for another birthday BBQ I am going to!

These look absolutely delicious!
ReplyDeleteI'd love to try and make some!
x x x
I've always wanted to make cake pops! They look delicious! Yum!
ReplyDeletexx
oh this looks super tasty!
ReplyDeleteThey look amazing! Genuinely like the sort you'd buy haha xx
ReplyDeleteWow these are so cool x
ReplyDeletethese look uh-mazing sophie! they really do. i was always so intrigued as to how you make them!
ReplyDeletebut look how purdy they look in their little bags! incredible.xx
Ah, these look lovely! Definitely something to add to the list of things to try making! x
ReplyDeleteThey look lovely ..so pretty infact i think i wouldnt want to eat them just look at them lol x
ReplyDeleteThese are amazing, I've wanted to try these for so long! They look too pretty to eat though, send a batch my way ;-) xx
ReplyDeleteOh wow, I have never had a cake pop but always eyed them up xx
ReplyDeleteOo these look so yummy! They'd be so cute to make <3
ReplyDeleteEllen xx
I must do this for my daughter's 4th birthday, they look lush! :) x
ReplyDeletehttp://anishaxoxox.blogspot.co.uk/
These look amazing, I'm gonna have to give them a try! xx
ReplyDelete